|
|
||
|---|---|---|
| .github/workflows | ||
| docs | ||
| utils | ||
| .gitignore | ||
| README.MD | ||
| baiduPush.sh | ||
| deploy.sh | ||
| package.json | ||
README.MD
Evan Blog —— web前端技术博客
介绍
使用 VuePress 构建 SEO 友好的静态博客站。内置 deploy.sh 和 GitHub Action 两种自动部署脚本,一键发布到 GitHub Pages。
使用
1、克隆项目后进入
git clone https://github.com/xugaoyi/blog
cd blog
2、安装依赖并运行开发服务
npm install # or yarn install
npm run dev # or yarn dev
使用yarn的可以把以下
npm run命令替换为yarn
3、编辑
编辑或新增 *.md文件,以及修改 docs/.vuepress/config.js 中的 nav 导航栏等信息(具体可查看 VuePress 文档),需重新运行·npm run dev并刷新浏览器查看更新。
4、部署
本项目包含两种部署方式:
1)、使用deploy.sh脚本部署
第一步,修改deploy.sh脚本内的仓库地址为你的仓库,如有自定义域名则一并修改,没有则注释
# 如果是发布到自定义域名
echo 'evanblogweb.com' > CNAME

# 如果发布到 https://<USERNAME>.github.io
# git push -f git@github.com:<USERNAME>/<USERNAME>.github.io.git master

# 如果发布到 https://<USERNAME>.github.io/<REPO>
# git push -f git@github.com:<USERNAME>/<REPO>.git master:gh-pages
第二步,一键部署命令
npm run deploy # 运行部署脚本deploy.sh,并发布到仓库的gh-pages分支
windows系统下使用bash命令窗
第三步,设置GitHub Pages为gh-pages分支。
2)、使用GitHub Action自动持续集成
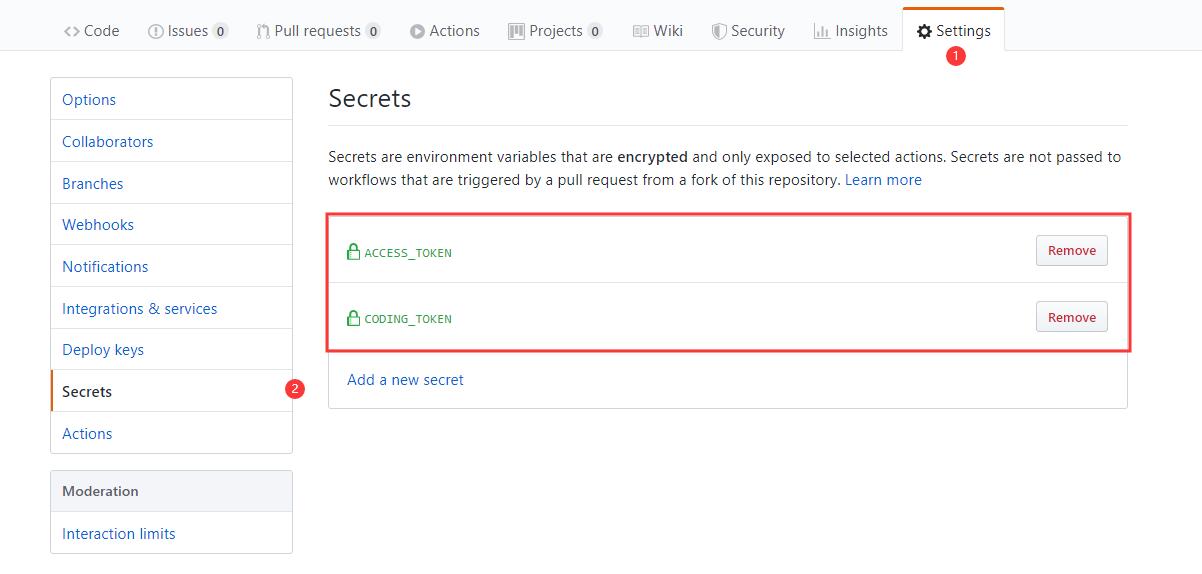
第一步,按照官方文档,生成一个github token (令牌)。
第二步,将这个密钥储存到当前仓库的Settings/Secrets里面。
Settings/Secrets是储存秘密的环境变量的地方。环境变量的名字可以随便起,这里用的是ACCESS_TOKEN。如果你不用这个名字,.github/workflows/ci.yml脚本里的变量名也要跟着改。
第三步,push提交代码到GitHub仓库master分支。
第四步,设置GitHub Pages为gh-pages分支。
注意:如果您有自定义域名,需要在
.github/workflows/ci.yml中修改evanblogweb.com为你的域名。如没有自定义域名,需要在
.github/workflows/ci.yml中去掉cd docs/.vuepress/dist && echo 'evanblogweb.com' > CNAME && cd -命令
4.1、部署升级:同时部署到github和coding
为了让博客站能够让百度收录,因此我把博客部署到了coding(腾讯云开发者平台),相关文章。
在原有部署方式上做了升级,实现同时部署到github和coding。
deploy.sh文件:
看不懂代码shell代码? 参考:https://ipcmen.com/
#!/usr/bin/env sh
set -e # 确保脚本抛出遇到的错误
npm run build # 生成静态文件
cd docs/.vuepress/dist # 进入生成的文件夹

# deploy to github
echo 'b.evanblogweb.com' > CNAME
if [ -z "$GITHUB_TOKEN" ]; then
  msg='deploy'
  githubUrl=git@github.com:xugaoyi/blog.git
else
  msg='来自github action的自动部署'
  githubUrl=https://xugaoyi:${GITHUB_TOKEN}@github.com/xugaoyi/blog.git
  git config --global user.name "xugaoyi"
  git config --global user.email "894072666@qq.com"
fi
git init
git add -A
git commit -m "${msg}"
git push -f $githubUrl master:gh-pages # 推送到github

# deploy to coding
echo 'www.evanblogweb.com\nevanblogweb.com' > CNAME  # 自定义域名
if [ -z "$CODING_TOKEN" ]; then  # -z 字符串 长度为0则为true;$CODING_TOKEN来自于github仓库`Settings/Secrets`设置的私密环境变量
  codingUrl=git@git.dev.tencent.com:xugaoyi/xugaoyi.git
else
  codingUrl=https://xugaoyi:${CODING_TOKEN}@git.dev.tencent.com/xugaoyi/xugaoyi.git
fi
git add -A
git commit -m "${msg}"
git push -f $codingUrl master # 推送到coding

cd - # 退回开始所在目录
rm -rf docs/.vuepress/dist
ci.yml文件:
看不懂yaml代码? 参考:https://evanblogweb.com/other/yaml.html
name: CI

# 在master分支发生push事件时触发。
on:
  push:
    branches:
      - master
jobs: # 工作流
  build:
    runs-on: ubuntu-latest #运行在虚拟机环境ubuntu-latest

    strategy:
      matrix:
        node-version: [10.x]

    steps:
      - name: Checkout # 步骤1
        uses: actions/checkout@v1 # 使用的动作。格式:userName/repoName。作用:检出仓库,获取源码。 官方actions库:https://github.com/actions
      - name: Use Node.js ${{ matrix.node-version }} # 步骤2
        uses: actions/setup-node@v1 # 作用:安装nodejs
        with:
          node-version: ${{ matrix.node-version }} # 版本
      - name: run deploy.sh # 步骤3 (同时部署到github和coding)
        env: # 设置环境变量
          GITHUB_TOKEN: ${{ secrets.ACCESS_TOKEN }} # toKen私密变量
          CODING_TOKEN: ${{ secrets.CODING_TOKEN }} # 腾讯云开发者平台(coding)私密token
        run: npm install && npm run deploy

      # - name: Build and Deploy # 步骤3 (只部署到github可以使用这个步骤)
      #   uses: JamesIves/github-pages-deploy-action@master # 作用:将项目构建和部署到github。 https://github.com/JamesIves/github-pages-deploy-action
      #   env: # 设置环境变量
      #     ACCESS_TOKEN: ${{ secrets.ACCESS_TOKEN }} # toKen私密变量
      #     BASE_BRANCH: master # 要部署的文件夹所在的分支.
      #     BRANCH: gh-pages # 部署到的分支
      #     FOLDER: docs/.vuepress/dist # 要部署的文件夹.
      #     BUILD_SCRIPT: npm install && npm run build && cd docs/.vuepress/dist && echo 'b.evanblogweb.com' > CNAME && cd - # 部署前要执行的命令(记得cd进入某个目录后,后面要cd -退回开始的目录)
使用前先将github token (令牌) 和coding token (令牌) 同时设置到github仓库的Settings/Secrets位置。
部署方式有两种:
1) 、使用如下命令一键部署到github和coding
npm run deploy
2)、使用GitHub Action自动部署到github和coding
只需要push提交代码到github仓库master分支即可。
自定义域名以及解析 (可选)
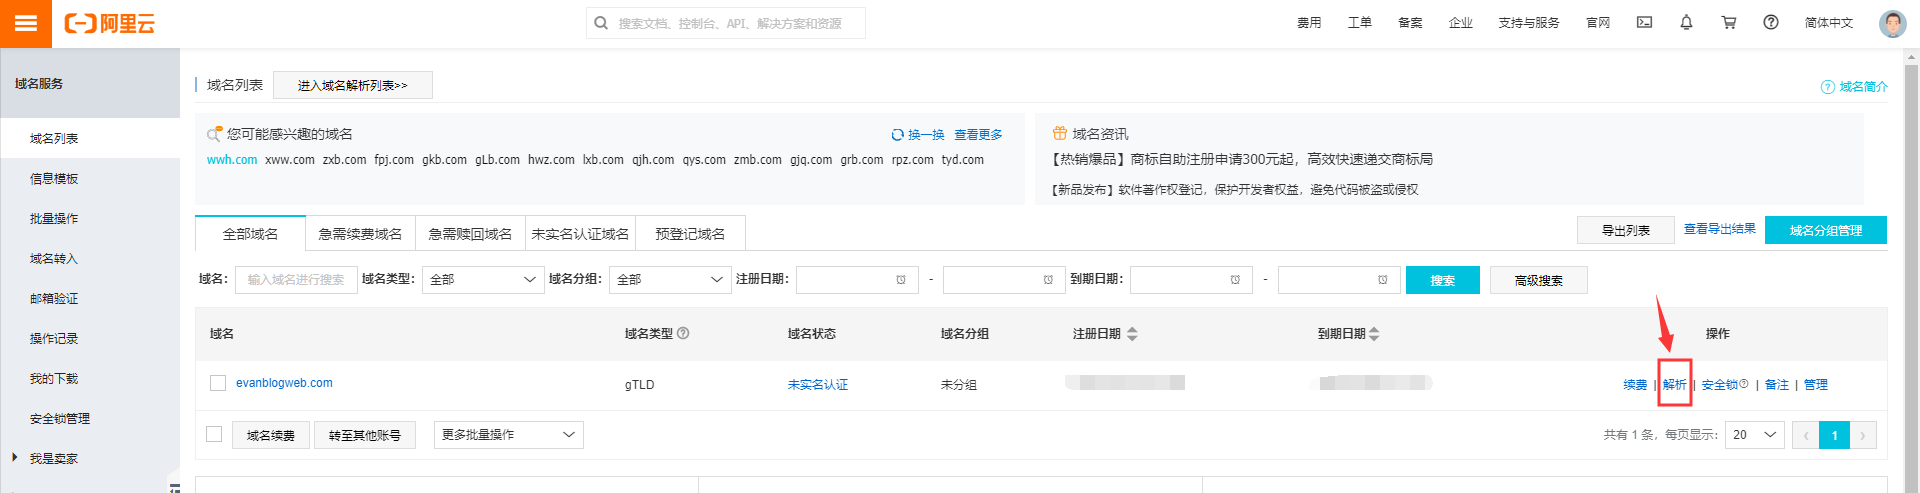
1、申请域名
申请域名当然去哪都行。 国内的阿里云,腾讯云,国外的freenom,namecheap什么的 。 操作大同小异,都是
-
注册账号,登录
-
搜索并找到可用的域名,买下来。比如我在阿里云买的一个域名:
evanblogweb.com
2、DNS解析
想要在浏览器里面输入evanblogweb.com就能跳到博客页面。我们首先需要做的就是将evanblogweb.com 与固定的ip地址绑定起来(A),或者是与某已有域名绑定起来(CNAME)。
这里以阿里云操作为例,步骤如下:
- 域名列表中点击
解析
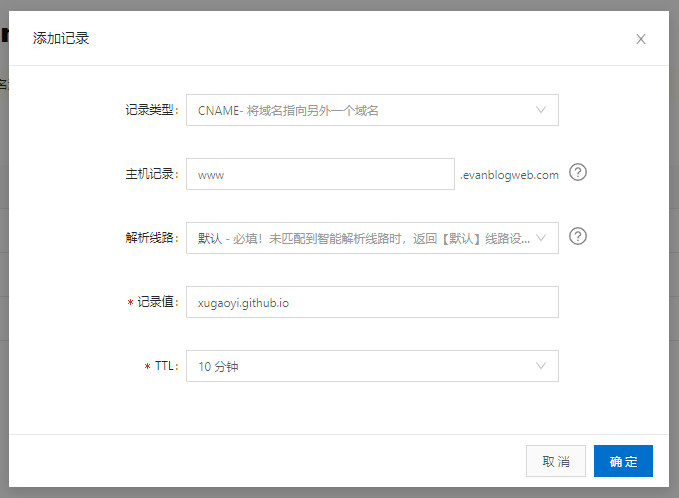
- 进入解析页面后,点击
添加记录。填入,记录类型:CNAME,主机记录:www,解析线路:默认,记录值:你的github pages地址<userName>.github.io,TTL:默认的10分钟,确定。
3、使github pages与域名关联
deploy.sh添加如下脚本
echo 'evanblogweb.com' > CNAME # // 域名替换成你的
在自动部署配置文件ci.yml的jobs.build.steps.<Build and Deploy>.env.BUILD_SCRIPT中添加脚本
"cd docs/.vuepress/dist && echo 'evanblogweb.com' > CNAME" && cd -
# 域名替换成你的
提示
md文件的yaml代码
必须放在 md 文件在最上方才能生效
百度自动推送和统计
加入了自动推送和统计插件
'vuepress-plugin-baidu-autopush', // 百度自动推送,作用:加快将页面推送给百度搜索,https://ziyuan.baidu.com/

[
    'vuepress-plugin-baidu-tongji', // 百度统计,https://tongji.baidu.com
    {
        hm: '8a59017a97d9fc47d607481723b7815d'
    }
]
如果你也需要百度统计功能,请把hm参数该为你自己的,请到https://tongji.baidu.com获取你自己的hm参数